


ILLA, the low code open source platform for developers, is proud to announce a collaboration with PingCAP’s TiDB, an open-source distributed NewSQL database that features horizontal scalability, high availability, real-time Hybrid Transactional and Analytical Processing (HTAP), and MySQL compatibility. This partnership aims to simplify application development by providing a database that meets data consistency, reliability, availability, scalability, and disaster tolerance requirements.
Today, organizations have to store, process, and manage more and more data; single-machine databases are hitting their physical limits. Traditional sharding mechanisms are unwieldy and hard to maintain as the business grows. TiDB solves these problems transparently through its distributed architecture while maintaining MySQL compatibility. TiDB Cloud, the fully managed TiDB service, can also simplify deployment, management, and maintenance through a web-based management interface in the cloud.
This tutorial will show you how to set up a TiDB cluster and build an administration panel that allows you to create, read, update, and delete entries. We’ll display the data in a table and use a panel to tab between creating and editing forms. We’ll do all this in less than 10 minutes.
Create a free cluster on TiDB Cloud
To create a cluster on TiDB Cloud:
Sign in with your TiDB Cloud account. If you are a new user, sign up for an account.
Create a free cluster and connect to it. Click Quick Start TiDB to learn how to use it. After running the sample application, you will get the TiDB connection information, including the server name, port number, database name, user name, and password. Be sure to note these; you’ll be using them in later steps.
Connect to TiDB with ILLA Builder
Now that you have a free TiDB Cluster, it’s time to connect it to the ILLA Builder.
Create a free account and sign in on the ILLA Builder welcome page.
Create a new application.
Connect to TiDB as an ILLA resource. Do one of the following:
If you already have a PingCAP resource in ILLA Builder, you can click + New to select it.
If you don’t have a TiDB resource in the ILLA builder, you need to click + New Resource to set up a new connection.
Test the new connection. If the connection is successful, save the connection as a new resource.
Use actions to execute basic create, read, update, and delete (CRUD) operations in the TiDB database. Actions bridge data and ILLA components and are essential to building an application.
a. Choose a TiDB resource and create actions.
b. In the input box, enter the SQL statement, save it as a new action
c. Click Run to execute the statement.
d. Run a query action to see if the insert action runs successfully.
You can create multiple actions and use different components to control their execution
Connect the component to the action
Components in ILLA Builder are built-in front-end UI libraries such as buttons and input boxes. To connect a component to an action:
- Under the component inspect panel on the right, select and drag the “text” and “input” components to the canvas in the middle.

- Create and save the required actions. You can refer to the component or action data by typing “{{”
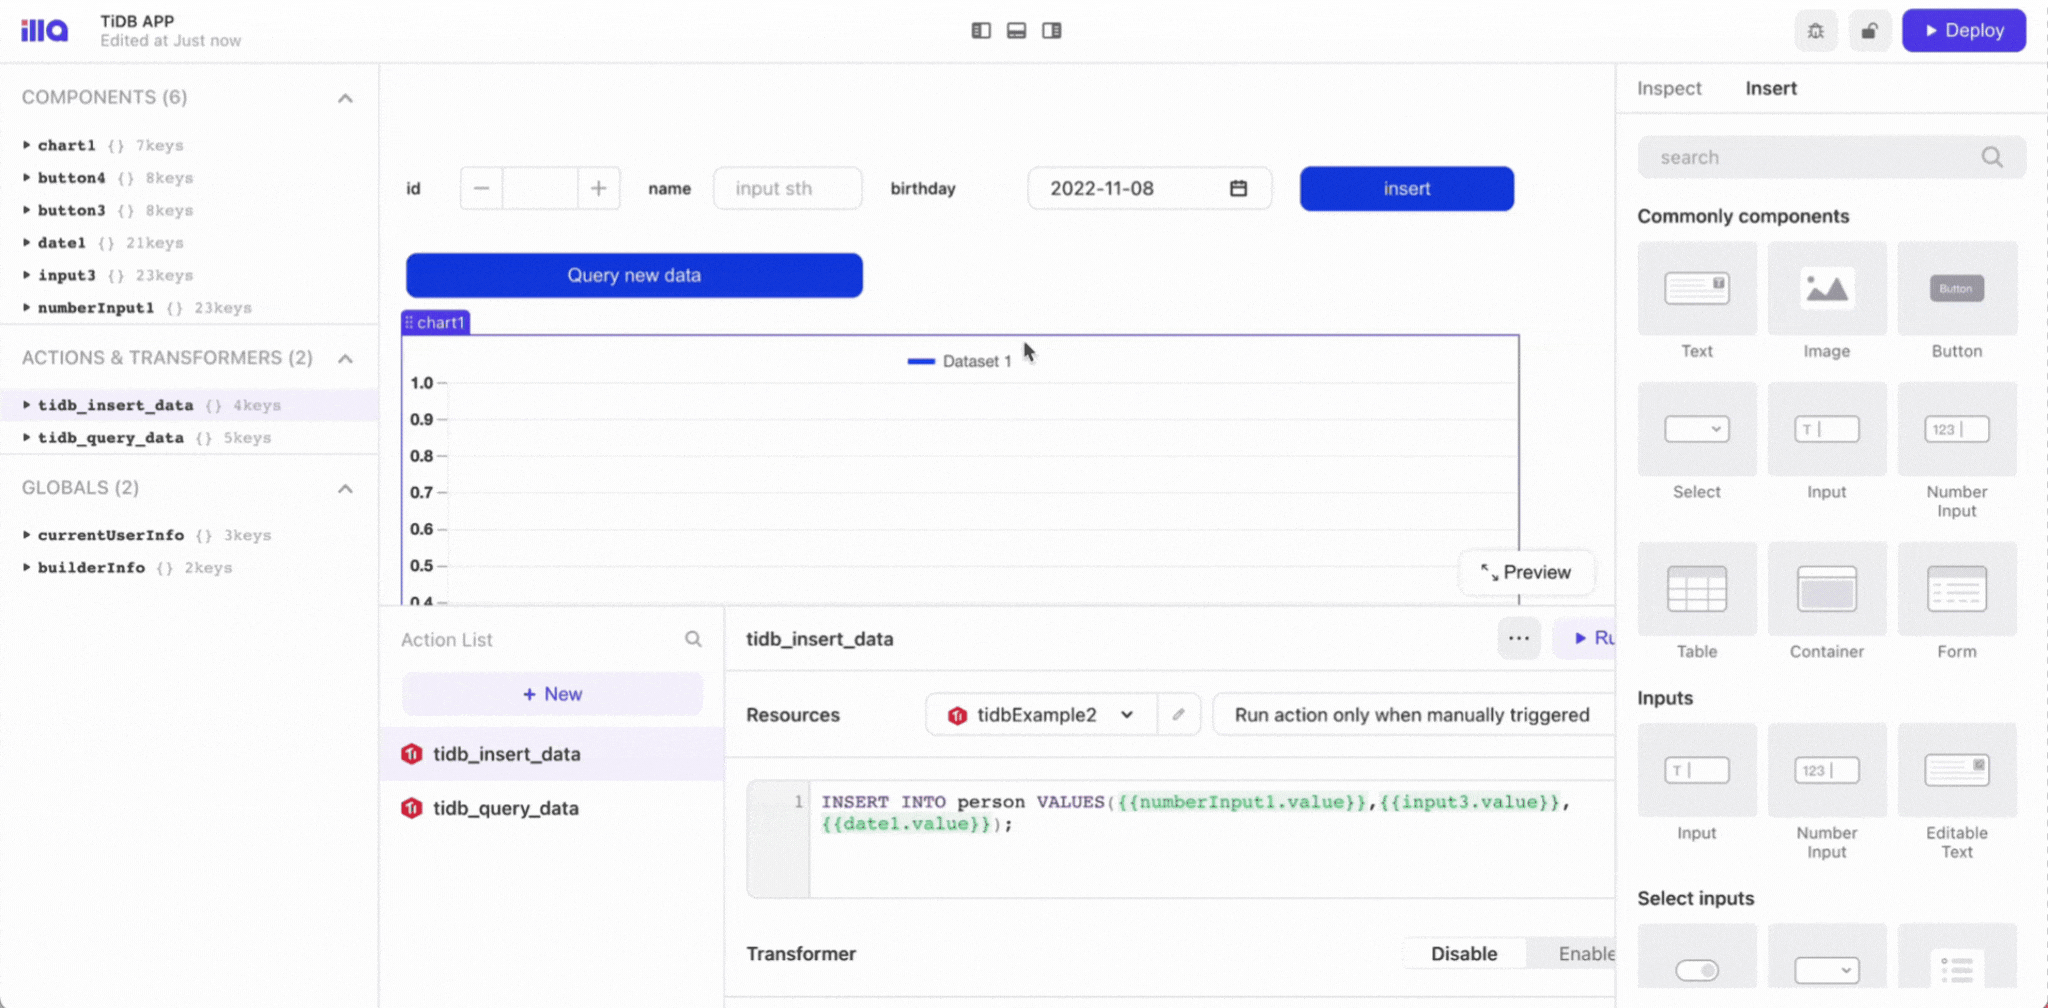
Here we will create two actions, tidb_query_data and tidb_insert_data, for later use.


You have successfully connected the component to the action.
Implement a simple web application with TiDB Cloud
Now that we have everything ready let’s build a simple web application with the basic components to add, delete, modify, or query the data from a TiDB table.
Create and configure an Insert button
Click on the Insert button component you just added to enter the Inspect panel on the right.
Under the Inspect panel, add an event handler, and configure the event handler as:
Event: Click
Action: Trigger query
Query: tidb_insert_data

Query data from a table
Click on the Query new data button you just created. This displays the Inspect panel on the right side of the screen.
In the Inspect panel, add an event handler, and configure it as follows:
Event: Click
Action: Trigger query
Query: tidb_query_data

Now you can execute the query action against the specified table in TiDB.
Visualize the query as a chart
In the Inspect panel on the right side, specify the dataset of the chart component to {{tidb_query_data.data}}.
Adjust the chart component settings, such as the chart type, location, and size.
Adjust the dataset settings, such as dataset values and aggregation method. The chart will update as you go.
Summary
In this article, we implemented a simple TiDB application that inserts new data, executes queries, and displays the query results as a chart. Integrating TiDB Cloud and ILLA builder can make developing your applications much faster and more efficient.

We believe the key to a successful open-source project is not only to code but also to collaborate through code. You are welcome to join our project. Check ILLA’s website or join the Discord community for more information.
You can check ILLA’s website here at: illacloud.com
GitHub page: github.com/illacloud/illa-builder
Join Discord community: discord.com/invite/illacloud